Workflow using n8n
Module 1: Introduction to n8n
- Understanding Workflow Automation
1. What is Workflow Automation?
Workflow automation is the process of using technology to perform tasks or processes without manual intervention. It involves setting up rules and triggers that automate repetitive or predictable actions, ensuring tasks happen consistently and efficiently.
For example:
- Automatically sending a “Thank You” email after someone fills out a form.
- Syncing new entries in a Google Sheet to a CRM like Aladintech.co.
Automation tools like n8n act as the bridge between different software applications, enabling them to communicate and work together seamlessly.
2. Key Components of Workflow Automation:
- Trigger Events:
A trigger is what starts a workflow. For example:
- A new email was received.
- A form submission.
- A specified time or date.
-
Actions: Actions are the tasks performed in response to a trigger. For example:
- Updating a database.
- Sending a notification.
- Posting a message in Slack.
-
Conditions: Conditions ensure that actions only happen when certain criteria are met. For example:
- Only send an email if the contact is marked as a VIP.
- Only add a task to your project manager if the due date is within 7 days.
3. Why is Workflow Automation Important?
-
Saves Time
Manual tasks like data entry or copying and pasting information are time-consuming. Automation lets you focus on more strategic or creative work.
Example: Automatically updating your CRM with data from web forms instead of manually inputting it.
-
Reduces Errors
-
Humans make mistakes, especially when performing repetitive tasks. Automation ensures consistency.
Example: Ensuring every new invoice is recorded correctly in your accounting software.
-
Scales Your Operations As your business grows, managing repetitive tasks manually becomes unsustainable. Automation scales with your needs.
Example: Handling thousands of customer queries using an AI chatbot.
4. Examples of Workflow Automation in Action:
- Marketing: Automating email campaigns with tools like Mailchimp or n8n. For example, sending a sequence of welcome emails when someone subscribes to your newsletter.
- Sales: Automatically adding leads from LinkedIn to your CRM and assigning them to a sales rep based on location.
- Customer Support: Using n8n to route customer tickets from email to a support desk platform like Zendesk or Freshdesk.
Resources for Further Learning:
- What is Workflow Automation? A Complete Guide
- Workflow Automation: How to Get Started
- Understanding Workflow Automation: Your Definitive Guide
2. Introduction to n8n
What is n8n?
- n8n is a low-code, node-based workflow automation tool that allows users to connect multiple applications and automate tasks. It’s known for its visual aspect and flexibility, as it supports custom code and integrations with APIs.
Capabilities
- n8n: As a “fair-code” platform, n8n offers extensive flexibility and customization. It allows users to create complex workflows with conditional logic, loops, and error handling. Developers can add custom code through custom Code Nodes, enhancing the platform's versatility. Developers also have the option to self-host their n8n environment.
- Zapier: Known for its user-friendly interface, Zapier simplifies the creation of straightforward automations, referred to as "Zaps." While it supports multi-step workflows, it may encounter limitations when handling more intricate automation scenarios.
- Make.com: Make.com provides a visual, drag-and-drop interface for building workflows, known as "scenarios." It supports complex automations with advanced features like routers and error handlers, catering to users seeking more intricate workflow designs.
- Resource: n8n Blog
Integrations
-
n8n: Offers over 300 pre-built integrations and the ability to create custom nodes, enabling connections to a wide range of services. Its source-available nature allows the community to develop and share new integrations continually. There are also a ton of custom nodes called “community nodes” that were built by members of the community!
-
Zapier: Boasts an extensive library of over 5,000 app integrations, making it one of the most comprehensive automation platforms in terms of connectivity. This vast selection allows users to connect a wide array of services with ease.
-
Make.com: Supports over 1,500 app integrations, offering a substantial range of connectivity options. Its visual interface and modular design facilitate the creation of complex workflows involving multiple applications.
Cost
- n8n: n8n is free to self-host, providing a cost-effective solution for those with technical expertise. For users preferring a managed service, n8n offers cloud plans starting at $20 per month, which include hosting and additional features like enterprise solutions!
- Zapier: Offers a free plan with limited features and paid plans starting at $19.99 per month. Pricing is based on the number of tasks (actions) performed, which can become costly as automation needs scale.
- Make.com: Provides a free plan with limited features and paid plans starting at $9 per month. Pricing is based on the number of operations (actions) executed, offering a more affordable option for complex workflows compared to Zapier.
- Resource: Save My Leads
Why Choose n8n?
- Flexibility and Customization: n8n's source available nature allows for unparalleled customization, enabling users to tailor the platform to their specific needs. The ability to add custom code and create bespoke integrations makes it a powerful tool for complex automation tasks.
- Cost-Effectiveness: With free self-hosting and affordable cloud plans, n8n provides a budget-friendly solution, especially for businesses looking to scale their automation without incurring high costs.
- Community and Support: n8n boasts an active community contributing to its continuous improvement. Users can access a wealth of shared workflows, custom nodes, and support from fellow automation enthusiasts.
- Data Ownership and Privacy: Self-hosting n8n ensures complete control over your data, enhancing security and compliance with data protection regulations.
In summary, while Zapier and Make.com offer robust automation capabilities with extensive integrations, n8n stands out for its flexibility, cost-effectiveness, and customization potential, making it an excellent choice for users seeking a powerful and adaptable automation platform.
For a visual comparison and further insights, you might find the following video helpful.
How Does n8n Work?
- Triggers: Every workflow begins with a trigger, such as:
- A new email in Gmail.
- An incoming webhook.
- A timer (e.g., run every day at 9:00 AM).
-
Core Nodes (T in ETL - Transform): These nodes process and transform data as it moves through the workflow:
- A function node that applies custom logic.
- A transformation node that formats data for output.
-
Action Nodes (E or L in ETL - Extract/Load): The final steps in a workflow perform specific actions, such as:
- Sending a message to Slack.
- Uploading a file to Dropbox.
- Adding an entry to a Google Sheet.
Setting Up n8n
Cloud vs. Self-Hosting
- n8n Cloud
- Managed by n8n’s team.
- Minimal setup required.
- Ideal for beginners or small businesses.
- Self-Hosting
- Full control over data and infrastructure.
- Can be hosted using Docker, Node.js, or other methods like k8s for horizontal scaling.
- Ideal for developers or enterprises with specific security needs.
Setting Up Your Instance
Setting up n8n can be approached in two primary ways: utilizing the managed n8n Cloud service or opting for a self-hosted setup. Below are resources to guide you through each method:
- n8n Cloud:
For a streamlined experience with minimal setup, n8n Cloud offers a managed environment where the n8n team handles hosting and maintenance. This option is ideal for beginners or those who prefer not to manage infrastructure.
-
Getting Started with n8n Cloud:
- Visit the n8n Cloud Sign-Up Page to create an account.
- After registration, access the web-based editor to begin building workflows immediately.
-
Self-Hosting n8n: Self-hosting provides full control over your n8n instance, allowing for customization and data sovereignty. However, it requires technical expertise to set up and maintain. Below are resources to assist with self-hosting n8n using various methods:
-
Official n8n Hosting Documentation:
-
The n8n Hosting Guides offer comprehensive instructions for installing n8n on different platforms using npm or Docker. They also provide guidance on configuration, scaling, and securing your n8n instance.
-
Community Tutorials:
-
An Easy Step-by-Step Guide on How to Self-Host n8n: This
community-contributed tutorial provides a beginner-friendly walkthrough for setting up n8n. Read the guide
-
How to Install n8n in Linux Using Docker-Compose: This article details the installation process on a Linux server using Docker Compose. Read the article
-
Video Tutorial:
-
Self-Host n8n Using Docker in 11 Minutes: A concise video tutorial demonstrating the setup of n8n with Docker. Watch on YouTube
-
The Easiest Way to Self-Host n8n in the Cloud: This video guides you through deploying n8n on a cloud platform. Watch on YouTube
-
Exploring the n8n Community and Templates
Why the Community Matters
The n8n community is a thriving hub for users to share tips, templates, and troubleshooting advice. Beginners can find tremendous value in exploring community-contributed workflows and participating in discussions.
Accessing Templates
-
Using the Template Library
Browse pre-built workflows at n8n Workflow Templates. Examples include:
- Sending automated birthday emails.
- Synchronizing data between Notion and Google Sheets.
-
Creating and Sharing Templates Advanced users can contribute their workflows to the community, helping others learn and adapt their solutions.
Best Video Tutorials on YouTube
Resources:
- n8n Masterclass: Build AI Agents & Automate Workflows (Beginner to Pro) Watch the Video Here
- How I’d Teach a 10 Year Old to Build AI Agent: Watch the Video Here
- n8n Beginner Course: Access the Playlist Here**
- A 9 video series created by n8n themselves
- Covers concepts like APIs, data handling, nodes, error handling, and more’
Module 1: Quick Recap
- You now understand workflow automation: What it is, its key components (triggers, actions, and conditions), and its importance for saving time, reducing errors, and scaling operations.
- You’ve been introduced to n8n: Its flexibility as an open-source tool, how it compares to Zapier and Make.com, and why it stands out (cost-effectiveness, customizability, and data privacy).
- You’ve learned how n8n works: Trigger nodes, processing nodes, and action nodes, and how they interact to build workflows.
- You know how to set up n8n: Whether using n8n Cloud for a managed setup or self-hosting for full control.
- You’ve explored the n8n community: Accessing templates, sharing workflows, and leveraging resources for troubleshooting and learning.
Module 2: Core Concepts and Nodes
Understanding Nodes
What Are Nodes?
In n8n, nodes are the fundamental building blocks of workflows. Each node represents a specific task or action, such as retrieving data from an API, processing information, or sending an email. By connecting nodes, you define the sequence and logic of your automated processes.
Types of Nodes:
-
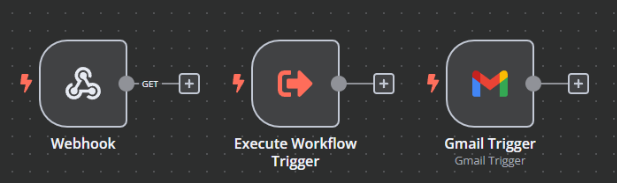
Trigger Nodes:
- Initiate workflows based on specific events or schedules. A trigger node is identified by an orange lightning bolt.
- Examples:
- Webhook Trigger: Starts a workflow when a specific URL is called.
- Execute Workflow Trigger: Starts a workflow when another workflow calls it.
- Gmail Trigger: Starts a workflow when an email is received.
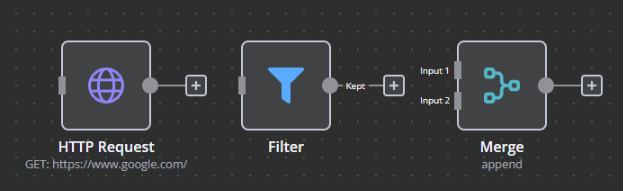
Regular Nodes:
- Perform actions like data retrieval, transformation, and delivery.
- Examples:
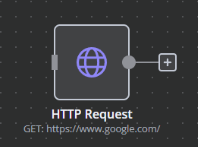
- HTTP Request Node: Makes HTTP requests to external APIs.
- Filter Node: Filters data on a defined condition.
- Merge Node: Appends or combines two datasets
Node Structure
Each node comprises:
- Parameters: Settings that define the node's behavior (e.g., API endpoints, authentication details).
- Input/Output Data: Data received from preceding nodes and passed to subsequent nodes.
- Credentials (Not Always): Authentication information for accessing external services securely.
Connecting Nodes:
Nodes are linked to establish the flow of data and the sequence of operations. The output of one node becomes the input for the next, creating a cohesive workflow.
Resources:
-
Connecting Google Credentials in 5 Minutes: Watch the Video on YouTube**
-
Lead Nurturing Automated Workflow: Watch the Video on YouTube**
-
AI Inbox Manager: Watch the Video on YouTube**
-
n8n Documentation: Nodes**
Provides detailed information on the various nodes available in n8n and their functionalities.
-
n8n Community Forum: Code Node for Beginners** Offers insights and examples on using the Code node effectively. (I always use ChatGPT or Claude to do my coding in n8n for me)
Exploring Core Nodes
Overview of Core Nodes: n8n offers a set of built-in core nodes essential for various operations
-
Edit Fields (Set) Node:
- Defines and manipulates data within the workflow.
- Allows setting static or dynamic values for use in subsequent nodes.

-
Code Node:
- Executes custom JavaScript code.
- Enables complex data transformations and logic implementation.

-
HTTP Request Node:
- Performs HTTP requests to interact with external APIs.
- Supports various methods like GET, POST, PUT, and DELETE.
-
Merge Node:
- Combines data from multiple nodes.
- Supports operations like merging by index or key.

-
Other useful “no-code” nodes:
- Split Out:
- Breaks a single input into multiple items, allowing you to process each item individually.
- Aggregate:
- Combines multiple items into a single output by grouping or summarizing data.
- Limit:
- Restricts the number of items processed or passed through to subsequent nodes.
- Split Out:
Practical Applications:
-
Edit Fields Node: Define default values or transform incoming data for consistency.
-
Code Node: Apply custom calculations or data formatting not covered by standard nodes.
-
HTTP Request Node: Fetch data from a REST API to enrich workflow information.
-
Merge Node: Combine data from two different sources for consolidated processing.
Resources:
- Scrape Unlimited Emails for Free: Watch the Video on YouTube**
- Multi AI Agent System: Watch the Video Here**
- n8n Documentation: Core Nodes Library**
Provides detailed information on each core node, including usage examples and configurations.
-
n8n Documentation: HTTP Request Node**
Offers guidance on configuring the HTTP Request node for interacting with external APIs.
Using Data Transformations Effectively
Overview Data transformation is essential when integrating various APIs, services, and data formats in n8n. This focuses on manipulating data to ensure compatibility and streamline automation workflows. You'll explore tools like the Set Node, expressions, and the Function Node for handling both simple and complex data transformations. Additionally, you'll learn about variables and the notation used in n8n for accessing and manipulating data.
-
Understanding Data Structures in n8n JSON Format in n8n In n8n, nodes output a payload of data represented as a JSON array of objects. Each top-level
object in the payload is considered an Item of data in n8n. By default, every node in n8n performs its configured action on each incoming item routed into its input.
Understanding the structure of JSON is crucial for efficiently manipulating and extracting data in workflows. Here are the key JSON components:
   - **Key-Value Pairs**: { "name": "John", "age": 30 }
   - **Arrays**: [ "item1", "item2", "item3" ]
- **Nested Objects**: { "customer": { "name": "John", "email": "<john@example.com>" } } -
Navigating Nested Data
To work with nested data, you can access fields using dot notation or square bracket notation, and you can reference previous node data in two ways: Relative Referencing: Use
$jsonto access the immediately previous node’s data.Example:
{{$json["customer"]["name"]}}accesses the "name" field inside "customer" from the current node's data. Absolute Referencing: Use $node["NodeName"].json to access data from a specific previous node.Example:
{{$node["Webhook"].json["data"]["order"]["id"]}}retrieves the "id" field from the "order" object output by the Webhook node.
This distinction between relative and absolute referencing ensures flexibility when working with data from multiple nodes, enabling efficient data manipulation and workflow construction.
Using the Set Node
The Edit Fields (Set) Node allows you to define and modify data fields within a workflow.
- Static Data: Add predefined static values to a workflow. Example: Adding a constant like "company": "n8n Inc." for use in later nodes.
- Dynamic Data: Map and transform incoming data to new fields. Example:
   Input: {"orderId": "12345"}
   Output with Set Node: {"Order\_ID": "12345"}
Steps to Use the Edit Fields (Set) Node:
- Add the Edit Fields (Set) Node to your workflow.
- Define fields under "Values" → "Add Field."
- Use expressions like
{{$json["fieldName"]}}to map dynamic data.
Resources:
-
Expressions in n8n Using Expressions in n8n
Expressions in n8n allow you to dynamically access, transform, and use data from nodes. They function much like a mail merge, where placeholders are replaced with actual values from your workflow.
Key Expressions
-
Accessing Data
-
Current Node Data: Use
{{$json["field"]}}to access data from the current node. Example:{{$json["firstName"]}}retrieves the value of the "firstName" field from the current node's data. -
Previous Node Data: Use
{{$node["NodeName"].json["field"]}}to retrieve data from a specific previous node. Example:{{$node["Webhook"].json["order"]["id"]}}retrieves the "id" field from the "order" object output by the Webhook node. -
Combining Fields
-
You can combine fields and text to create dynamic outputs:
- Example: Hello
{{ $json["firstName"] }} - Output: Hello John.
- Example: Hello
-
Alternative Syntax
While
{{"Hello " + $json["firstName"]}}is also valid, the simpler syntax{{ $json["firstName"] }}is often preferred in low-code environments for readability and ease of use. -
Why This Matters
- Thinking of expressions as a "mail merge" can help you grasp their flexibility in customizing outputs, making them intuitive for both technical and non-technical users.
Practical Use:
Combine dynamic text fields for an email subject line:
{{$json["firstName"] + " placed order #" $json["orderId"]}}
-
Resources:
-
Advanced Data Manipulations with the Function Node
The Code Node in n8n lets you use custom JavaScript for complex data transformations. It provides flexibility for advanced use cases, as long as the output is a valid n8n item format: an array of objects (or an empty array).
Examples
Date Conversion
Convert a timestamp into a readable format:
return [{ date: new Date($json["timestamp"]).toLocaleString() }];
Array Filtering
Extract specific items from an array:
return $json["items"].filter(item => item.price > 50);
Perform Calculations
Calculate a total amount:
return [{ totalPrice: $json["quantity"] \* $json["unitPrice"] }];
Steps to Use the Code Node
- Add the Code Node to your workflow.
- Write your JavaScript code in the "Code" section.
- Use return to output transformed data in the required format: an array of objects or an empty array.
Key Note
Always ensure the output adheres to n8n’s expected format. For example: Valid Output:
return [{ key1: "value1", key2: "value2" }];
Empty Output:
return [];
By adhering to this format, your workflows will run smoothly and handle data correctly.
Resources:
-
Variables in n8n and Understanding the Notation
In n8n, variables are essential for accessing and manipulating data within workflows. Understanding how to utilize these variables and the appropriate notation is crucial for effective workflow development.
Types of Variables:
-
Helper Variables:
- $json: Represents the data of the current node. It's commonly used to access the input data within the node where the expression is written.
- Resource: n8n Documentation
- $node: Allows access to the output data of other nodes in the workflow. This is particularly useful when you need to reference data from previous nodes.
- $workflow: Provides information about the current workflow, such as its name and ID. This can be helpful for logging or conditional operations based on workflow metadata.
- Resource: n8n Documentation
- $env: Enables access to environment variables set in your n8n instance. This is useful for managing configuration values that may vary between different environments (e.g., development, staging, production).
-
Resource: **n8n Community Notation for Accessing Data:
Dot Notation:
Used to access object properties directly when the property names are simple (i.e., they don't contain spaces, special characters, or start with a number).
-
- $json: Represents the data of the current node. It's commonly used to access the input data within the node where the expression is written.
-
In this example, customer is an object within the current node's JSON data, and name
is a property of that object.
Square Bracket Notation:
Necessary when property names include spaces, special characters, or are dynamic (e.g., stored in another variable).
{{$json["customer name"]}}
- This approach ensures that property names with spaces or special characters are correctly interpreted.
Accessing Data from Other Nodes:
To reference data from a different node within your workflow, use the $node variable combined with the appropriate notation:
{{$node["PreviousNodeName"].json["fieldName"]}}
Replace "PreviousNodeName" with the exact name of the node you're referencing and
"fieldName" with the specific field you wish to access.
Practical Example:
Suppose you have a node named "Webhook" that receives the following JSON payload:
{

"order": { "id": "12345",

"customer": { "name": "Jane Doe",

"email": "<jane.doe@example.com>"

},

"items": [

{

"product": "Laptop", "quantity": 1,

"price": 1200

}

]

}

}
To extract the customer's email from this payload in a subsequent node, you would use:
{{$node["Webhook"].json["order"]["customer"]["email"]}}
This expression drills down through the nested JSON structure to retrieve the desired value.
Best Practices:
- Consistent Naming: Use consistent and descriptive names for your nodes and data fields to make expressions more readable and maintainable.
- Error Handling: Be cautious of null or undefined values when accessing nested properties. Consider using optional chaining (e.g.,
{{$json?.customer?.name}})
to prevent errors if a property doesn't exist.
- Testing Expressions: Utilize n8n's expression editor to test and validate your expressions, ensuring they return the expected results before implementing them in your workflow.
2.4: Integrating Third-Party Services**
Connecting to External Applications:
n8n enables seamless integration with various third-party services, allowing for automated data exchange and process management across platforms.
Methods of Integration:
-
Pre-built Nodes:
- n8n provides a collection of built-in nodes for popular services like Google Sheets, Slack, and Trello.
- These nodes simplify the process of connecting and interacting with external applications.
-
HTTP Request Node:
- For services without dedicated nodes, the HTTP Request node allows you to interact with any API by configuring HTTP methods, headers, and payloads.
-
Custom Nodes:
- Develop custom nodes to cater to specific integration requirements not covered by existing nodes.
- These can be published as community nodes (and a great place to check out how to do them or if they’ve already been created!)
Authentication and Credentials:
- OAuth2: Used by services like Google and Facebook for secure authorization.
- API Keys: Simple tokens provided by services to authenticate requests.
- Basic Authentication: Uses a username and password combination for access.
Resources:
-
Understanding APIs in n8n: Watch the Video on YouTube**
-
n8n Blog: Definitive Guide to API Integration for Engineers**
Offers an in-depth look at API integration concepts and practices.
-
n8n Documentation: Integrations**
Provides comprehensive guides on integrating various services with n8n.
-
n8n Community Forum: Automate Screenshots, PDFs, and More: Integrating n8n with Self-Hosted Browserless & Playwright**
Discusses advanced integration scenarios and their implementations.
-
You now understand nodes in n8n: What they are, their types (Trigger Nodes and Regular Nodes), and their role as the building blocks of workflows. You’ve learned how nodes connect to define the sequence and flow of data.
-
You’ve explored core nodes: The Set Node for defining and manipulating data, the Function Node for running custom JavaScript, the HTTP Request Node for interacting with APIs, and the Merge Node for combining data from multiple sources.
-
You’ve learned how to use expressions: Dynamically access and manipulate data using expressions like
{{$json["field"]}}(current node data) and{{$node["PreviousNode"].json["field"]}}(data from previous nodes). -
You’ve mastered data transformations: Leveraging the Set Node for simple modifications and the Function Node for advanced operations like date formatting, array filtering, and calculations using JavaScript.
-
You now understand variables and notation in n8n: Using global variables ($json,
$node, $workflow) and applying dot notation or square bracket notation to access and manipulate nested JSON data.
-
You’ve learned how to integrate third-party services: Using pre-built nodes for popular applications, the HTTP Request Node for API interactions, and different authentication methods (OAuth2, API Keys, and Basic Auth) to ensure secure connections.
Module 3: Building and Managing Workflows
3.1: Designing Effective Workflows
Understanding Workflow Design
Effective workflow design is crucial for automating processes seamlessly. It involves mapping out each step of a process, determining the sequence of actions, and identifying the necessary conditions and data transformations.
Key Considerations:
- Define Objectives: Clearly outline the goals of the workflow.
- Identify Triggers and Actions: Determine what events will initiate the workflow and the subsequent actions to be performed.
- Data Flow Management: Ensure data is accurately passed between nodes.
- Error Handling: Plan for potential errors and define fallback mechanisms.
Practical Steps:
- Process Mapping: Visualize the entire process to understand the flow and dependencies.
- Node Selection: Choose appropriate nodes that align with each task in the process.
- Conditional Logic: Incorporate conditions to handle different scenarios within the workflow.
- Testing: Regularly test the workflow to identify and rectify issues.
Resources:
-
5 n8n Tips You Need to Know: Watch the Video on YouTube**
-
Everything I Learned About AI Agents in 2024: Watch the Video on YouTube**
-
n8n Documentation: Designing the Workflow**
Provides a step-by-step guide on constructing workflows, including practical examples.
-
n8n Community Forum: Optimizing Workflow Automation with Effective Storage Solutions**
Discusses strategies for efficient workflow design and data management.
3.2: Workflow Execution and Monitoring
Execution Modes in n8n
n8n offers two primary execution modes:
-
Manual Execution:
- Used during the development phase to test workflows.
- Allows step-by-step observation of workflow behavior.
-
Production Execution (Workflow must be activated):
- Workflows run automatically based on defined triggers.
- Suitable for live operations.
Monitoring Executions
Effective monitoring ensures workflows operate as intended and facilitates prompt troubleshooting.
Key Aspects:
- Execution History: Review past executions to analyze performance and identify issues.
- Error Tracking: Monitor and log errors for debugging purposes.
- Performance Metrics: Assess execution times and resource utilization.
Tools and Features:
- Execution List: Access a comprehensive list of all workflow executions.
- Execution Search: Utilize filters to locate specific executions based on criteria like status or date.
- Retry Mechanism: Re-execute workflows that encountered errors after resolving issues.
Resources:
- n8n Documentation: Executions**
Details on execution modes, monitoring tools, and best practices.
Explores features that enhance workflow monitoring and management.
3.3: Advanced Workflow Features
Leveraging Advanced Features
n8n provides advanced functionalities to create sophisticated workflows:
-
Conditional Logic:
- Use IF Nodes to execute actions based on specific conditions.
- Facilitates dynamic decision-making within workflows.
-
Looping Mechanisms:
- Implement loops to process multiple items or repeat actions.
- Achieved using nodes like Loop and Merge.
-
Error Handling:
- Design workflows to handle errors gracefully using Error Trigger Nodes.
- Define alternative actions or notifications upon encountering errors.
Implementing Advanced Features
- Expressions: Incorporate dynamic data and functions within nodes.
- Custom Code: Use the Function Node to execute JavaScript for complex operations.
- Sub-Workflows: Modularize workflows by calling reusable sub-workflows.
Resources:
-
Export and Import Workflows: Watch the Video**
-
n8n Community Forum: Demo: Secure Workflow Automation & Advanced AI with n8n**
Showcases advanced workflow capabilities and AI integrations.
3.4: Debugging and Error Workflows
Debugging and error handling are crucial for building reliable and efficient workflows in n8n. This guide provides strategies to help you understand and implement effective debugging and
error-handling techniques.
-
Understanding Errors in n8n
Errors in n8n can arise from various sources, including misconfigured nodes, incorrect data inputs, or external service failures. Recognizing the types and origins of errors is the first step toward effective debugging.
-
Utilizing Execution Data
n8n maintains detailed execution data for each workflow run, encompassing node data, parameters, variables, execution context, and binary data references. This information is invaluable for debugging and monitoring your workflows. You can configure how much execution data n8n stores in the database through environment variables or workflow settings.
-
Accessing the Executions Log
The Executions Log records details of each workflow run, including successes and failures. To access it:
- Click on the "Executions" option in the left-side panel of the n8n editor.
- Review the list to find executions marked as "Error."
- Select an execution to view detailed information about the error, including the node where it occurred and the error message.
This log helps pinpoint the exact location and nature of issues, facilitating targeted troubleshooting.
-
Implementing Error Workflows with the Error Trigger Node
n8n offers an "Error Trigger" node that activates a separate workflow whenever an error occurs in your main workflow. This feature is useful for automating error notifications and handling.
Setting Up an Error Workflow:
- Create a new workflow dedicated to error handling.
- Add the "Error Trigger" node as the starting point.
- Configure subsequent nodes to define actions upon errors, such as sending an email or a Slack message with error details.
- In your main workflow, navigate to "Workflow Settings" and assign the newly created error workflow as the designated error handler.
This setup ensures that any errors in your main workflow automatically trigger the error workflow, providing immediate notifications and facilitating prompt resolution.
-
Handling Errors Within the Workflow
n8n allows you to manage errors directly within a workflow using the "Continue On Fail" option. This setting enables a node to continue executing even if it encounters an error, allowing the workflow to proceed with alternative actions.
Using "Continue On Fail":
- Click on the node you want to configure.
- In the node's settings, enable the "Continue On Fail" option.
- Optionally, handle the error output by connecting the node's error output to subsequent nodes designed to manage errors.
This approach allows for more resilient workflows that can handle errors gracefully without abrupt termination.
-
Utilizing the Debug Helper Node
The Debug Helper node assists in inspecting and understanding the data passing through your workflow, making it easier to identify issues.
Using the Debug Helper Node:
- Insert the Debug Helper node at various points in your workflow where you want to inspect data.
- Execute the workflow in manual mode to observe the data output at each stage.
- Analyze the data to ensure it matches your expectations and identify any discrepancies.
This practice allows you to monitor the data flow within your workflow, making it easier to spot and correct errors.
-
Best Practices for Debugging and Error Handling
-
Modular Workflow Design:
- Break down complex workflows into smaller, manageable modules.
- Test each module independently to ensure functionality before integrating them into a larger workflow.
-
Comprehensive Testing:
- Test workflows with various data inputs to cover different scenarios and edge cases.
- Regular testing helps identify potential issues before they affect production.
-
Implementing Error Branches:
- Configure nodes to handle errors gracefully by setting up error branches.
- This approach allows the workflow to continue executing alternative actions when an error occurs, rather than terminating abruptly.
-
Regular Monitoring and Maintenance:
- Regularly review the Executions log to monitor workflow performance and identify recurring issues.
- Update and maintain workflows to adapt to changes in external services or data structures.
By following these practices, you can enhance the reliability and efficiency of your n8n workflows, ensuring they perform as intended even when unexpected issues arise.
-
Additional Resources
For further learning and practical demonstrations, consider exploring the following resources:
-
Video Tutorial:
- **"Master n8n Error Workflows: Get Instant Email Alerts on Failures"** – This tutorial provides a step-by-step guide on setting up error workflows and sending notifications.
-
Community Discussion:
- **"Creating Error Workflows in n8n"** – A detailed discussion on setting up error workflows and using the Error Trigger node.
- You now understand workflow design: How to define objectives, map out processes, choose appropriate nodes, and incorporate conditional logic. You’ve learned the importance of testing workflows to ensure they run smoothly.
- You’ve explored workflow execution and monitoring: n8n offers manual execution for testing and production execution for live workflows. You’ve learned how to monitor workflows using the Executions Log, track errors, and analyze performance metrics.
- You’ve learned about advanced workflow features: Using conditional logic with IF nodes, implementing loops for repetitive tasks, handling errors gracefully with error branches and triggers, and optimizing workflows through parallel processing.
-
You now understand debugging and error handling:
- Identifying errors using the Executions Log and error messages.
- Setting up automated error workflows with the Error Trigger Node for notifications.
- Using the Debug Helper Node to inspect and monitor data flow during execution.
- Following best practices like modular workflow design, comprehensive testing, and error branches to improve reliability.
Module 4: Introduction to AI Agents
4.1: Understanding AI Agents
Definition and Functionality
An Artificial Intelligence (AI) agent is a software program designed to interact with its environment, perceive data, and perform tasks autonomously to achieve specific goals. These agents utilize algorithms and data to make informed decisions, adapting their actions based on feedback and learning from experiences.
Types of AI Agents
-
Reactive Agents:
- Respond to environmental stimuli without internal states or historical context.
- Operate on a simple condition-action basis.
-
Goal-Based Agents:
- Act to achieve specific objectives, considering future consequences of actions.
- Utilize planning and decision-making processes.
-
Utility-Based Agents:
- Evaluate different actions based on a utility function to maximize performance.
- Balance between multiple goals and preferences.
-
Learning Agents:
- Improve performance over time by learning from experiences.
- Adapt to changes in the environment.
Applications of AI Agents**
- Customer Service:
- Chatbots and virtual assistants provide instant, personalized responses, enhancing customer satisfaction.
-
Process Automation:
- Automate repetitive tasks, allowing human workers to focus on complex and creative activities.
-
Data Analysis:
- Analyze large datasets to extract insights and support decision-making processes.
-
Coding Operations:
- AI agents assist in generating, debugging, and optimizing code, as well as automating repetitive development tasks such as testing, deployment, and documentation.
Resources:
-
Everything I Learned About AI Agents in 2024 in 19 Minutes: Watch the Video**
-
Provides an overview of AI agents, their principles, benefits, and components.
-
IBM: What Are AI Agents?**
Discusses the functionalities and learning mechanisms of AI agents.
4.2: Integrating AI with n8n
n8n's AI Capabilities
n8n empowers users to integrate advanced AI functionalities into their workflows using specialized nodes and seamless platform integrations. These tools enable users to build workflows that incorporate tasks like content generation, data analysis, and predictive modeling.
AI Nodes in n8n
n8n provides AI nodes designed for specific tasks or use cases, each with the flexibility to incorporate dependencies like AI models, tools, memory, and output parsing. Key AI nodes include:
- AI Agent Node: Automates decision-making processes by utilizing AI models, memory for context retention, and tools for task-specific actions.
- Summarization Chain: Condenses large datasets or text into concise summaries.
- Question and Answer Chain: Processes data to generate precise answers to user queries.
- Basic LLM Chain: Simplifies interaction with large language models for custom use cases.
These nodes can be configured with external AI models, tools, and memory systems to deliver task-specific functionality.
AI Integrations
n8n supports direct integrations with leading AI platforms, enabling workflows to access advanced capabilities:
- OpenAI: Use models like GPT for natural language processing, content generation, and conversational AI.
- Google AI Services: Leverage tools for vision, speech, and text-based tasks.
- IBM Watson: Integrate for language processing, data analysis, and machine learning.
Steps to Build AI-Enhanced Workflows
-
Leverage AI Nodes:
Choose appropriate AI nodes based on your workflow requirements, such as summarization, data-driven decision-making, or question answering.
-
Connect with AI Platforms:
Configure nodes with necessary credentials to integrate with AI services like OpenAI, Google AI, or IBM Watson.
-
Define Dependencies:
Set up AI models, tools, memory (for context), and output parsing to enhance node functionality.
-
Design AI-Powered Workflows:
Incorporate AI nodes into workflows for tasks such as:
- Content Generation: Automate creation of emails, reports, or marketing materials.
- Predictive Analytics: Analyze trends to make data-driven predictions.
- Automation: Streamline repetitive processes using intelligent agents.
-
Test and Optimize:
- Validate the functionality of AI nodes within your workflows.
- Optimize performance by refining parameters, node configuration, and dependencies.
By prioritizing AI nodes as foundational building blocks and integrating them with advanced AI services, n8n provides a flexible and scalable platform for AI-enhanced workflows.
Resources:
-
AI Agent Masterclass in n8n: Watch the Video on YouTube**
-
I Built a Team of Research Agents for Newsletter Automation: Watch the Video on YouTube**
-
I Built a Technical Analyst AI Agent: Watch the Video on YouTube**
-
n8n Blog: AI agents for developers: from theory to practice with n8n**
Explores the fundamentals of AI agents and guides on building them using n8n.
-
How AI Agents are Evolving: The age of autonomous AI agents is here.**
4.3: Practical AI Agent Implementations
Use Cases of AI Agents in n8n
-
Automated Customer Support:
-
Deploy AI agents to handle customer inquiries, providing instant responses and solutions.
-
Content Generation:
- Utilize AI to create articles, summaries, or reports based on input data.
-
Data Analysis and Reporting:
- Implement AI agents to analyze datasets and generate insightful reports.
-
Personal Assistants:
- Develop AI-driven assistants to manage schedules, send reminders, and perform routine tasks.
Implementation Steps:
-
Define Objectives:
- Clearly identify the tasks and goals for the AI agent.
-
Select AI Tools:
- Choose appropriate AI models or services that suit the defined objectives.
-
Design Workflow:
- Create n8n workflows integrating the selected AI tools to perform the desired tasks.
-
Monitor and Improve:
- Continuously monitor the AI agent's performance and make necessary adjustments for improvement.
Resources:
-
AI Personal Assistant 2.0: Watch the Video on YouTube**
-
Voice Email Agent: Watch the Video on YouTube**
-
Voice RAG Agent: Watch the Video on YouTube**
-
AI Agent Game Changer: Watch the Video on YouTube**
-
n8n Community Forum: How to Automate Your Life with AI Using n8n: Step-by-Step Guide!**
Offers a detailed tutorial on automating tasks using AI within n8n.
4.4: Prompting AI Agents
Importance of Effective Prompting
Prompting is the art of crafting clear and specific inputs for AI agents to maximize their effectiveness. A well-constructed prompt enables the AI to understand the task better, leading to more accurate and relevant responses. While effective prompting is powerful, it should be combined with other strategies for critical use cases, as large language models (LLMs) can struggle with tasks requiring precision, such as accurate word counts or exact numerical outputs.
Key Elements of a Good Prompt
- Clarity
Be explicit about what you want the AI to do.
- Example: Instead of "Summarize this," use "Summarize the following article in 3 bullet points."
-
Context
Provide enough background information or context for the AI to understand the scope.
-
Example: "You are a customer support agent. Respond to this query professionally."
-
Constraints
Specify any rules or limitations for the output.
-
Example: "Write a response in less than 100 words."
-
Examples (Multi-shot Prompting)
Use one or more examples (shots) to guide the AI on the desired format, tone, or structure. Relevant examples significantly improve task success.
-
Zero-shot prompting: No example provided. Example: "Translate this sentence into French."
-
One-shot prompting: A single example. Example: "Translate the sentence below into French. Example: 'Hello' -> 'Bonjour.'"
-
Few-shot prompting: Multiple examples to guide the AI.
-
Example:
"Translate these sentences into French:
- 'Hello' -> 'Bonjour'
- 'How are you?' -> 'Comment ça va?' Now translate: 'Good morning.'"
-
Prompting Strategies
- Task Specification
Directly state the goal of the task.
-
Example: "Translate the following text into Spanish."
-
Iterative Refinement
Refine your prompt based on the AI’s output to get closer to your desired response.
- Example: After receiving a vague summary, adjust the prompt to: "Summarize this text with a focus on the key findings."
-
Role Assignment
Assign a specific role to the AI for contextual responses.
-
Example: "You are a legal advisor. Draft a brief based on this contract clause."
-
Temperature Control
Adjust the creativity level of the AI for different outputs using parameters like temperature or top-p in tools like GPT-based models.
-
Example:
- Lower temperature (e.g., -2) for precise answers: "Provide a factual summary of this data."
- Higher temperature (e.g., -8) for creative outputs: "Write a fictional story about a robot in the future."
Health Warning: Combining Prompting with Other Strategies
While prompting can significantly enhance the performance of AI models, LLMs may struggle with tasks requiring exact accuracy, such as counting or strict adherence to constraints like word limits. For such use cases, consider combining prompting with validation strategies,
post-processing, or external checks to ensure the desired output quality.
Tools for Testing Prompts
-
OpenAI Playground:
- Experiment with different prompts and parameters to optimize outputs.
-
Visit Playground
-
OpenAI Tokenizer
- Test out the tokenization of your prompts for cost effectiveness.
- Tokenizer
Resources for Mastering Prompting
- AI Agent Prompting Masterclass: Watch the Video on YouTube**
- How To Add Reasoning to AI Agents via Prompt Engineering: Prompting strategies enhance an agent's reasoning capabilities, helping problem-solve for AI apps.**
- Master Prompt Engineering for AI Automations & Agents: The ability to quickly master prompt engineering has become a critical skill for optimizing AI agents and automation systems**
-
You’ve gained a strong understanding of AI agents: Their types (reactive,
goal-based, utility-based, and learning agents) and applications in customer service, process automation, and data analysis.
-
You’ve learned to integrate AI with n8n: Using AI nodes (e.g., OpenAI, Summarization Chain, Basic LLM Chain) to incorporate AI-powered capabilities like language processing, image recognition, and sentiment analysis.
-
You’ve explored practical AI agent use cases: Including customer support bots, AI-driven personal assistants, and content generation workflows.
-
You’ve mastered effective prompting: Crafting clear, context-rich, and specific prompts to maximize AI output quality, along with tools like OpenAI Playground for testing prompts.
Module 5: Advanced AI Integrations
5.1: Connecting to AI Services
Overview
Integrating AI services into your n8n workflows enhances automation capabilities, enabling tasks such as natural language processing, image recognition, and data analysis. n8n supports connections to various AI platforms, including OpenAI, Google AI, and more.
Steps to Connect AI Services in n8n
- Identify the AI Service: Determine which AI service aligns with your workflow requirements. For instance, use OpenAI for language processing tasks or Google Vision AI for image analysis.
- Obtain API Credentials: Register with the chosen AI service to acquire the necessary API keys or tokens required for authentication.
-
Configure n8n Integration:
- Add the Appropriate Node: In n8n, add the node corresponding to your AI service (e.g., OpenAI node).
- Enter API Credentials: Input the API key or token into the node's authentication settings.
- Set Parameters: Define the parameters for the AI service, such as the prompt for a language model or the image URL for analysis.
- Test the Connection: Execute the workflow to ensure the AI service responds correctly, verifying successful integration.
Best Practices
- Secure Your API Keys: Store API credentials securely to prevent unauthorized access.
- Monitor Usage Limits: Be aware of the API usage limits to avoid service interruptions.
- Handle Errors Gracefully: Implement error-handling mechanisms to manage potential API failures or timeouts.
Resources
- Access 278 AI Models with One API Key: Watch the Video on YouTube**
- n8n Integrations: Explore available AI integrations on the n8n website.
- OpenAI Integration Guide: Learn how to integrate OpenAI with n8n.
5.2: Building AI-Powered Workflows
Overview
Creating AI-powered workflows in n8n allows for the automation of complex tasks, such as content generation, data analysis, and decision-making processes. By leveraging AI integrations, you can enhance the efficiency and intelligence of your workflows.
Steps to Build AI-Powered Workflows
- Define the Workflow Objective: Clearly articulate the goal of the workflow and how AI will contribute to achieving it.
-
Design the Workflow Structure:
- Identify Input Sources: Determine where the data originates (e.g., user input, databases, APIs).
- Select AI Processes: Decide which AI capabilities are needed (e.g., text summarization, sentiment analysis).
- Determine Output Actions: Define what should happen with the AI-processed data (e.g., send an email, update a record).
-
Implement the Workflow in n8n:
- Add Necessary Nodes: Incorporate input, AI processing, and output nodes into the workflow.
- Configure Node Settings: Set up each node with the appropriate parameters and credentials.
- Establish Data Flow: Ensure data is correctly passed between nodes, maintaining the integrity of the process.
-
Test and Optimize:
- Run the Workflow: Execute the workflow to observe its performance.
- Analyze Results: Assess whether the AI outputs meet expectations.
- Refine as Needed: Make adjustments to improve accuracy and efficiency.
Example Workflow: AI-Powered Content Generation
- Objective: Automate the creation of social media posts based on recent blog articles.
-
Workflow Structure:
- Input: RSS feed of the blog.
- AI Process: Use OpenAI to generate a concise summary suitable for social media.
- Output: Automatically post the summary to social media platforms.
Resources
- n8n AI Workflows: Explore AI workflow templates on the n8n website.
- AI Workflow Automation Guide: Learn about AI workflow automation in 2024.
5.3: Case Studies and Real-World Applications
Overview
Examining real-world applications of AI integrations in n8n provides valuable insights into practical implementations and benefits. Case studies demonstrate how organizations have leveraged AI to enhance their operations.
Case Study 1: Injecting Human Intelligence into AI Workflows
- Organization: SanctifAI
- Challenge: Integrate human intelligence into AI agent workflows to improve decision-making processes.
-
Solution:
- Workflow Design: Utilized n8n to create workflows that incorporate human inputs at critical decision points.
- AI Integration: Combined AI processing with human judgment to enhance accuracy and reliability.
- Outcome: Achieved a 3x increase in workflow development speed compared to traditional methods.
- Source: n8n
Case Study 2: AI-Powered Children's Storytelling on Telegram
- Project: AI-Powered Children's English Storytelling
- Challenge: Automate the creation and distribution of children's stories via Telegram.
-
Solution:
- Workflow Design: Developed an n8n workflow to generate stories using AI and distribute them through a Telegram bot.
- AI Integration: Employed AI for content generation, audio creation, and image production.
- Outcome: Streamlined content creation and delivery, enhancing engagement with the target audience.
- Source: n8n
Resources
- n8n Case Studies: Explore more case studies on the n8n website.
- AI Workflow Examples:
Module 5: Quick Recap
- You’ve learned to connect AI services: Identifying suitable AI platforms (e.g., OpenAI, Google AI), obtaining API credentials, and securely integrating these services with n8n workflows.
- You’ve built AI-powered workflows: Designing workflows that combine AI processes (e.g., text summarization, data analysis) with automation tasks like sending emails or updating records.
- You’ve reviewed real-world case studies: Understanding how organizations use n8n to integrate AI for tasks like human-in-the-loop decision-making and automated storytelling.
- You’ve seen the power of AI integrations in action: From personal assistants to creative content automation, highlighting the vast possibilities with n8n and AI.